Learn How To Create Your Own Label Templates
Our top tips and tricks to help you to create your own label templates.
Step One: Work Out The Best Way To Create A Label Template In Your Software
The software used to create label templates often determines the form those templates take. Templates created in graphics packages use a background layer, which replicates the outline of each label. Word templates use a table, where each cell represents a label on the sheet (or a gap between two labels).
Watch a video: learn how to make a label template in Word using our step by step How To video.
Templates should represent the layout of a sheet of labels and guide the placement of your designs. This way only your designs will print out onto your labels (and not the template itself).
For example, the background layer used in PDF templates does not print. The tables used in Word templates do not have borders, which means they do not print.
The simplest solution is to use tools in your software designed to create new documents based on specified measurements. For example, in Word, the Mailings > Labels tool allows you to create a label template simply by entering the various measurements of your labels.
Click on Mailings > Labels > Options > New Label and then fill in the measurement fields to create your label template.
If your software doesn’t offer this function, you could use the available design tools to recreate your label layout. For example, some templates use shapes and text boxes to indicate the position of each label on the sheet.
Step Two: Understand The Measurements Of Your Label Layout
Whether you use a tool that automatically creates a label template for you or construct one yourself, you will need to know the relevant measurements for your label size and layout.

These are the details that you will need to know:
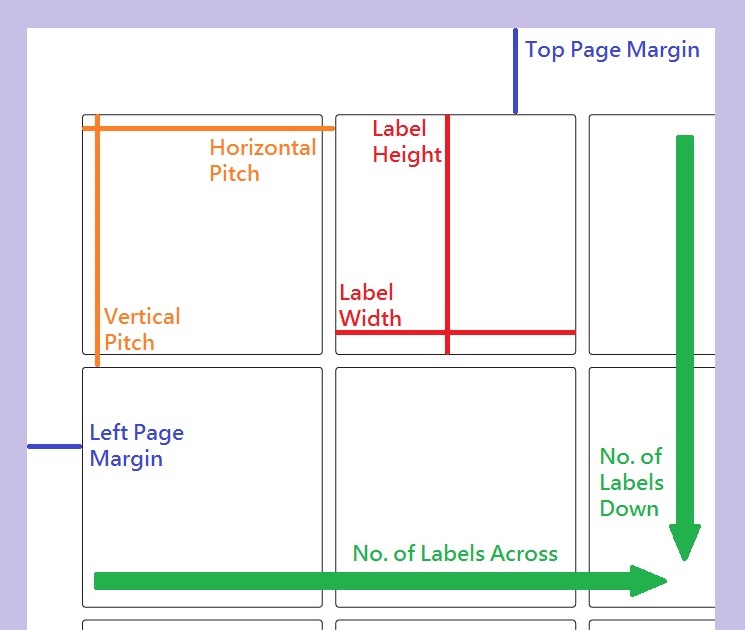
- Page Orientation: most label templates are portrait because label manufacturers and suppliers use the portrait orientation. This means that layout measurements tend to refer to a portrait orientation. To create a landscape template you need to switch the label width and height, the number of labels per column and per row, the horizontal and vertical pitches, AND the top/bottom and left/right page margins.
- Page Size: don’t forget to specify a page size of A4 or your template will NEVER align correct. Use 210mm wide by 297mm high for portrait templates and 297mm wide by 210 high for landscape templates.
- Label Width: the measurement from the left edge to the right edge of each label. This is the diameter of round labels. For oval labels, this is the measurement between the widest points of the oval.
- Label Height: the measurement from the top edge to the bottom edge of each label. Again, this is the diameter of round labels. For oval labels it is the measurement between the deepest points of the oval.
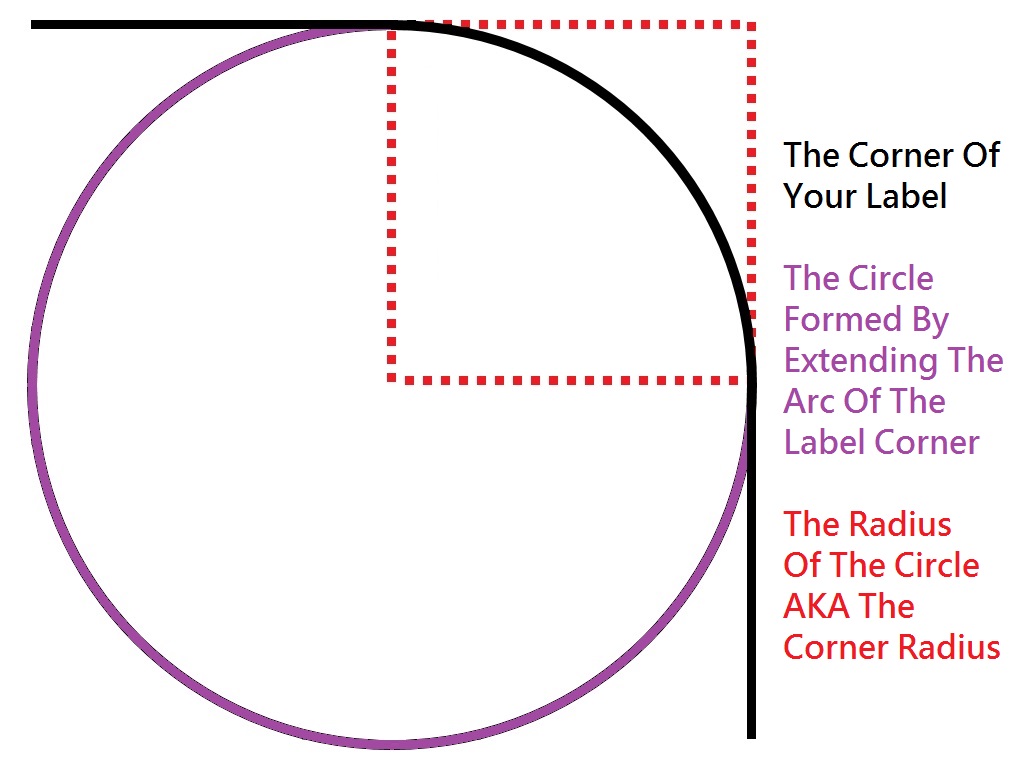
- (Corner Radius): rectangular and square labels may have curved or pointed corners. If they are curved, you may need to indicate the degree or curvature. This is the corner radius, which refers to the radius of the circle that is created by extending the corner arc to form a complete circle. Measure from where the corner starts to curve to the point that the corner would form if it wasn’t curved – see diagram below.

- Number of Labels Per Column: how many labels are in each column.
- Number of Labels Per Row: how many labels are in each row.
- Horizontal Pitch: the horizontal pitch accounts for any gaps between the columns; it measures from the left edge of the first label in the first column to the left edge of the first label in the second column. You can also measure the width of the gap between two columns and add this to the label width.
- Vertical Pitch: the vertical pitch, therefore, accounts for any gaps between the rows. It measures from the top edge of the first label in the first row to the top edge of the first label in the second row. Again, you can measure the height of the gap between two rows and add this to the label height.
- Page Margins: the page margins indicate the blank space (if any) around the edges of your sheet – i.e. the gap between the edges of your sheet and the start of each column / row of labels. So, the top margin goes from the top edge of the sheet to the top edge of the first row of labels. The bottom margin from the bottom edge of the sheet to the bottom edge of the last row of labels. The left margin measures from the left edge of the sheet to the left edge of the first column of labels. The right margin from the right edge of the sheet to the right edge of the last column of labels. The left and right margins may be collectively referred to as the side margins.
We supply these measurements for all of our label sizes and layouts. Visit our template home page and select your label shape and size to view the measurements for your A4 labels. These pages also feature our Word and PDF templates, which are free to download and use.
 Label Planet