How And Why You Should Format Images In Word Label Templates
Learn how to format images to make it easier to create label designs in Word.
Word is a word processor, which means that it will always be most efficient at handling words. It can be harder to work with images – especially in Word label templates. This post will talk you through some of the most important ways you can format (or edit) images to make it easier to create your required design – as well as explaining why it’s important to make use of these formatting options.
View our How To video for a step by step guide to working with images (and text) in Word label templates.
Formatting Images In Word Label Templates – WRAP TEXT
Among the most important tools (if not THE most important tool) for formatting images is the WRAP TEXT option. This tool allows you to choose how you want Word to position your image in relation to the text around it.
You may wonder why this is important – especially if your Word label template doesn’t contain any words.
The problem is that – as a word processor – Word assumes that you will add text at some point. It therefore uses a default Wrap Text format called “In Line With Text”. This positions your image “in line” with your text – regardless of whether or not you’ve actually added any text.
Essentially, Word divides your label template into (invisible) lines in preparation for the text it thinks you’re going to add. If you add an image, Word will only let you align it in relation to one of these lines. This limits where you can position your image. If you need even a little bit of control over the positioning of your image, you’ll need to change this setting.
It also gives you access to some formatting tools that are NOT available under the “In Line With Text” wrap option. It’s always worth changing the wrap text format even if you can position your image just fine with the default option.
How To Use Wrap Text In Word Label Templates.
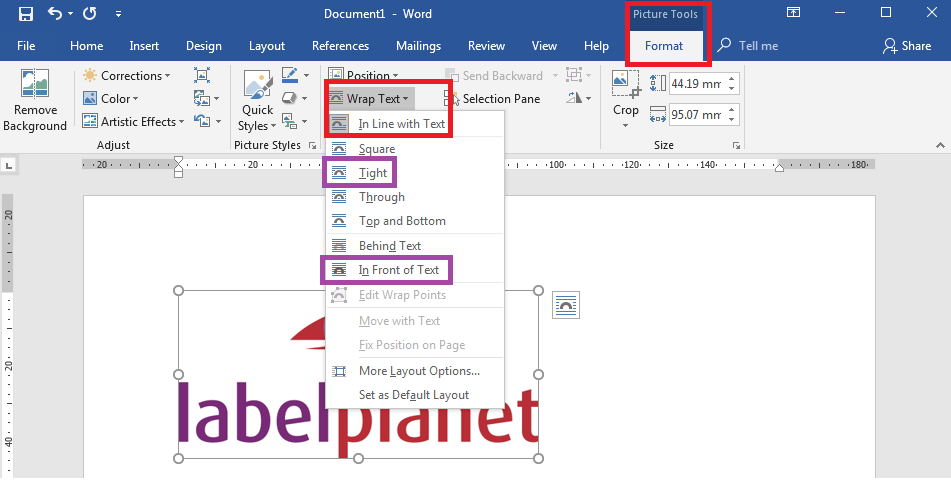
Left click once on your image to select it. This will bring up the Picture Tools Format tab at the top of the page.
The Wrap Text tool is contained in the “Arrange” section of the ribbon.
You have a variety of options to choose from; we recommend choosing “Tight”. This means that Word will allow your image to sit very close to your text – giving you more flexibility over where you can position that image in your template.
If you have problems with your image disappearing behind your template or other text-based elements in your design, try using “In Front Of Text”.

Formatting Images In Word Label Templates – BRING FORWARD & SEND BACKWARD
If you are creating a design by layering multiple elements (e.g. text, text boxes, WordArt, shapes, images etc), you will need to use the Bring Forward and Send Backward tools to layer your elements correctly.
You may also need to use the Bring Forward option, even if you aren’t layering elements. As we mentioned above, Word is designed primarily to handle text. This causes Word to also prioritise text-based elements over images. The result being that images that you add to your template may end up sitting behind the template itself (because it is a table and Word assumes you will want to add text to it at some point.
How To Use Bring Forward & Send Backward In Word Label Templates.
Left click once on your image to select it. This will bring up the Picture Tools Format tab at the top of the page.
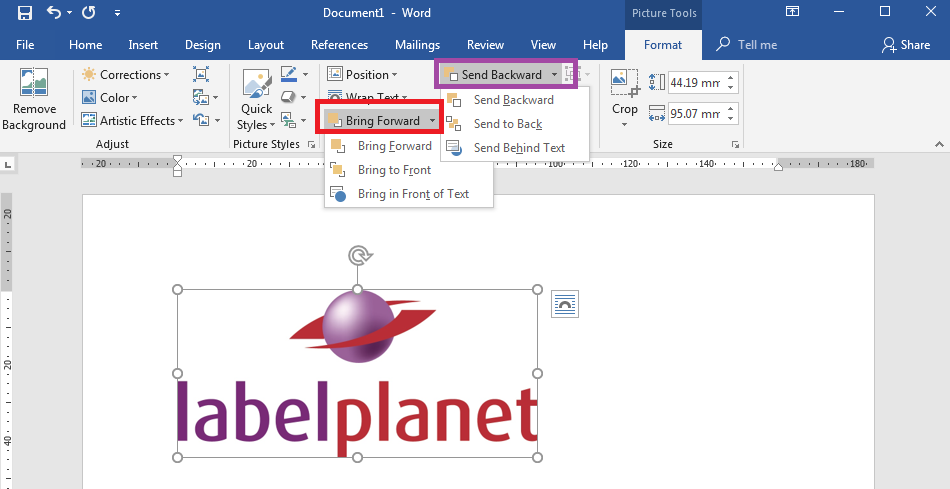
Both the Bring Forward and Send Backward tools are contained in the “Arrange” section of the ribbon and provide three options.
- “Bring Forward” / “Send Backward” will move your image forward or backward by one layer. I.e. it will move in front of or behind the adjacent layer/element.
- “Bring To Front” / “Send To Back” will make your image the topmost or bottommost element regardless of how many elements you have layered above or below your selected image.
- “Bring In Front Of Text” / “Send Behind Text” will move your image so that it sits in front of or behind of ALL of the elements that contain text.
Remember, this includes elements that Word assumes you may want to add text to in the future – including the table used to create the label template itself.
If an image (or other element) is completely covered by another element, you may struggle to click on it to select it in order to layer it correctly. Click on the element that is covering it to bring up the Picture Tools Format (or Drawing Tools Format) tab. In the “Arrange” section, there is a tool called Selection Pane. This will bring up a pane on the right hand side, which shows ALL of the elements in your label template. Clicking on one of the elements in the selection pane will select that element for you.

Formatting Images In Word Label Templates – (RE)SIZE IMAGES
Obviously, if your design includes images they need to be the right size to fit onto your blank labels.
While you can add images into a Word label template and THEN resize them, we recommend trying to ensure that your images are about the right size BEFORE adding them to your template. Making minor adjustments to the size within a template is easy enough but adding in images that are too big or too small can cause extra problems.
For example, adding very large images could cause Word to try to be helpful by automatically changing the size and layout of your template to accommodate your content. This effectively destroys the alignment produced when you print your template.
A more common issue is that resizing images can also lower the quality of the image – especially if your image has low resolution. Making sure your image is the right size BEFORE you add it to your template helps to preserve the image quality.
One of our top tips is to paste your image into a blank Word document so that you can check to make sure that the image is the right size and quality for your needs – before pasting it into your label template.
How To Resize Images In Word Label Templates.
There are two ways to resize an image.
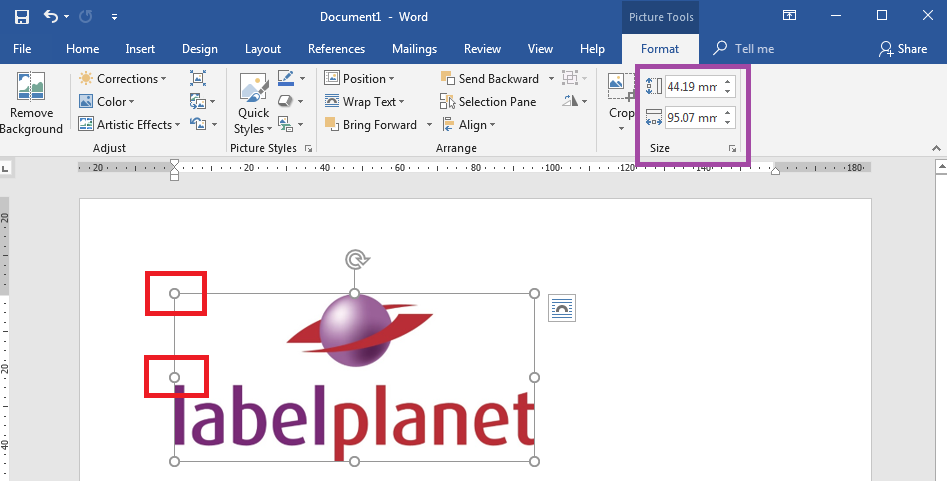
- Left click once on your image to select it. Selected images have sizing “handles” at the four corners and along each of the four edges of the image. Click on one of the handles and hold down the button as you drag your cursor outwards (to increase the size) or inwards (to decrease the size) – release the button to resize your image. The corner handles will alter the width AND height of the image; central handles only alter the width OR the height.
- Left click once on your image to select it. The far right section of the Picture Tools Format tab will indicate the width and height of your image. Enter the measurements that you want into these boxes to resize your image to a precise size.
With both options, you need to be aware that images may or may not have a “locked aspect ratio”. This refers to the relationship between the width and height of your image. A locked aspect ratio means that when you resize an image, Word preserves the proportions of your image.
For example, if you change the width of a 5cm by 5cm image to 3cm, the height will automatically change to 3cm to preserve the aspect ratio. Likewise, if you try to use a corner sizing handle to resize your image, you will only be able to create a larger or small square-shaped image.
If the aspect ratio is not locked, you can alter the width and the height independently of one another.
To change this setting, right click on your image and select “Size and Position”. On the Size tab, check or uncheck “Lock aspect ratio” as required.

Formatting Images In Word Label Templates – CROP IMAGES
Finally, you may need to crop your images to ensure they are a suitable shape for your label size.
For example, your original image may be rectangular in size but you need a square image for your square labels. Alternatively, you may have an image with a larger background area than you need, in which case you can use the Crop tool to reduce the original image to the area that you actually need/want to use.
Cropping images can also be a useful tool when you need your image to fill each blank label. You can crop your image down to the correct shape OR remove any unnecessary blank/background areas that prevent your image from fitting in your label template properly.
How To Crop Images In Word Label Templates.
Left click once on your image to select it. This will bring up the Picture Tools Format tab at the top of the page.
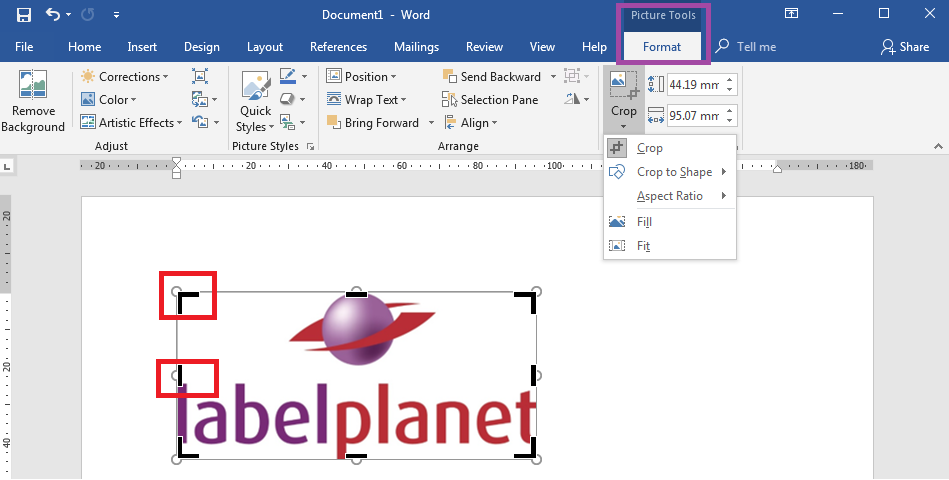
The Crop tool is contained in the “Size” section of the ribbon. You can crop your image in a number of ways:
- Clicking on the Crop button will add crop handles to your image. You use these in the same way as the sizing handles – only when you release the button, your image will be cropped to the area that you select rather than resized.
- Selecting Crop To Shape in the drop down list will create a shaped area into which you can crop your image (you can choose the size of this area using the crop handles). This is a quick way to, for example, crop a rectangular image down into a circular image.
- Selecting Aspect Ratio in the drop down list allows you to make sure that when you crop your image you can create a specific aspect ratio accurately (compared to trying to do this manually using the crop handles).

 Label Planet