How (And Why) To Perform A Test Print Of Your Label Templates
How to perform a test print (and the reasons why you should).
One piece of advice that we repeat again and again (and again!) is – when printing label templates DO A TEST PRINT FIRST! In this post, we explain how to go about doing a test print. We also explain why it is so important to do a test print when printing your own self adhesive labels.
What Is A Test Print?
A test print involves printing your label template onto a sheet of paper to check that the alignment is correct. This is done before you print onto your sticky labels proper.
When performing a test print, you should follow the same set of steps that you would during a “real” print. This includes the way that you load your paper and the print settings that you choose before you press print.
Why Test Print A Label Template?
A test print gives you the chance to check that the alignment produced by your label template (and printer) is accurate BEFORE you start printing on your blank labels. This means that if there is anything wrong you can correct it without wasting any of your label sheets.
Most of the time, the alignment will be fine – which is why many people don’t bother with a test print. However, if you’re printing lots of sheet labels at once, not doing a test print can be a costly mistake.
You might think you don’t need to test print your label template because it’s set up perfectly. There are. however, other factors at play. Even the most perfect label template can turn out badly printed labels. Usually because you haven’t taken the time to load your sheet labels correctly and select the correct print settings.
How Do You Test Print A Label Template?
When performing a test print you should follow the same steps as you would when printing your actual sticky labels. You simply use a blank sheet of paper instead of your sheet labels.
Whether you are testing printing a label template or printing it for “real”, you should always follow these simple steps:
1: Load Your Labels Levelly In The Right Location
You should always load your sheet labels (or paper) into the media bypass tray of your printer – if it has one.This is a second tray (usually just above or below the main paper tray), which is designed to process thicker materials (like sticky labels) and to offer a straighter path through the printer (reducing the chances of sheets rotating as they are pulled through the printer and improving the alignment of your template).
Always make sure your sheets are neatly aligned and position them inside the tray with the guides positioned levelly against the edges of your sheets. This also helps to stop your sheets rotating as they are processed.
2: Pick The Perfect Printing Properties
The majority of the alignment issues that we help our customers to resolve are caused by incorrect printer settings. Before printing, go into Printer Properties or Printing Preferences and confirm the following:
- The page size must be A4.
- No scaling options should be applied. This includes a percentage of less than 100% or any options called “Fit To Sheet” or “Fit To Page”. If there is an “Actual Size” option, use it.
- No options such as “Ignore Printer Settings” or “Use Default Settings” / “Use Driver Settings” should be selected. These will ignore any options you select manually in favour of the default set stored in the printer’s driver software.

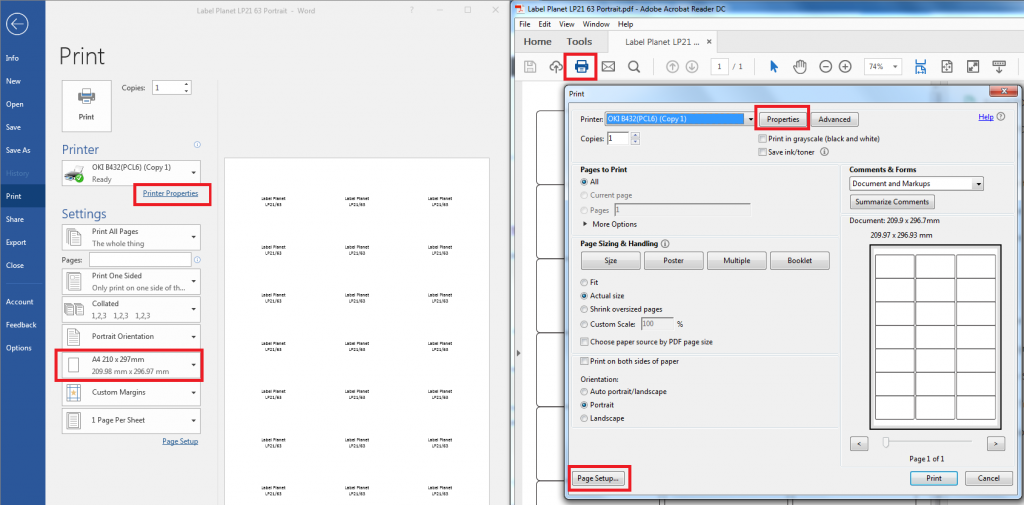
This image shows Word’s Print Preview screen and Adobe Reader’s Print screen.
In Word, click on File and then Print to reach the Print Preview screen. You should go into Printer Properties to confirm that your printer is using the correct settings. You can also use this screen to confirm that your label template itself is set to an A4 page size.
In Adobe Reader, click on the Print Icon (or File > Print). You can then confirm that your document is set to print out at the correct size, check your print settings (click on Properties), and confirm that the page size of your label template is A4 (Page Setup).
3. Check The Alignment Of Your Test Print
Once you have printed your test sheet, place it behind a sheet of your blank labels and then (CAREFULLY!) hold both up to a light source. This should allow you to see the positioning of your design on the test sheet and to confirm if this aligns correctly with the blank labels.
If the alignment isn’t quite right, you can correct your label template (or printer settings) accordingly. When making changes to your template or printer settings you should ALWAYS repeat the process of doing a test print to make sure that those changes have worked.
 Label Planet