How To Make Label Templates With Word’s Table Tools
Learn how to create label templates using Word’s Table Tools.
Watch a video: this advice is also available in video format.
View our step by step How To video to learn how to make label templates in Word.
You might be wondering why you would want to use Table Tools instead of Label Tools – after all, you do want to create labels rather than tables. For most people, the “Create Labels” tool is the quicker and easier option. However, if your A4 labels are a bit more complicated (for example, they include different label sizes or irregular layouts) or if the Create Labels tool simply isn’t playing fair, then you might need the flexibility of Table Tools.
Don’t panic at choosing “Table” tools rather than “Label” tools. Word label templates are basically tables so it doesn’t matter whether you use Table Tools or Label Tools – either way you will be creating a table that represents the layout of your blank A4 labels.
TABLE TOOLS – Setting Up The Page
It’s best to start at the very beginning and get your page set up to suit A4 labels. There are TWO key considerations: orientation and margins.

Page Orientation
For the vast majority of label templates, you don’t need to change the orientation because tnew blank documents default to a portrait orientation. If you would prefer to use a landscape orientation, you need to click on “Layout” at the top of the page, select “Orientation”, and choose “Landscape”.
Page Margins
Next you should set up the correct page margins. Click on the “Layout” tab at the top of the page, select “Margins”, and choose “Custom Margins” from the drop down list.
Enter the measurements for your four page margins (top, bottom, left, and right). We recommend setting the bottom page margin to 0mm as this helps to prevent Word from automatically adding a second page – especially if the margins on your A4 labels are particularly small.
TOP TIP: we recommend going through all of the tabs in the Page Setup box to check the following:
- Margins Tab: make sure the Gutter Margin is set to 0mm.
- Paper Tab: make sure the Paper Size is set to A4 with a width of 210mm and a height of 297mm.
- Layout Tab: make sure the Header and Footer are set to 0mm.
At this point, Word will probably say that your margins are “outside the printable area” and give you options to “Fix” or “Ignore” the problem. Click on “Ignore” to set up the page margins that you need.
TABLE TOOLS – Adding A Table
As we’ve mentioned, Word label templates are basically tables that represent the size and layout of your A4 labels (including any gaps between the blank labels).
First, you need to determine how many rows and columns you need. If there are no gaps between your blank labels, you simply count up how many rows and columns of blank labels are on each sheet. Alternatively, if there ARE gaps between your rows and/or columns of blank labels, you need to decide if you want to represent those gaps with blank rows and columns in your label template OR include them in the rows and columns that represent your blank labels.
Top Tip: we recommend including blank rows and columns to represent gaps wherever possible. This creates a more accurate representation of your A4 labels and you don’t have to remember to account for any gaps when adding your label design.
For example: in our LP21/63 label size, there are 7 rows of blank labels with NO GAPS between the rows and 3 columns of blank labels with GAPS. This means that we need to insert a table that contains 7 rows and 5 columns.

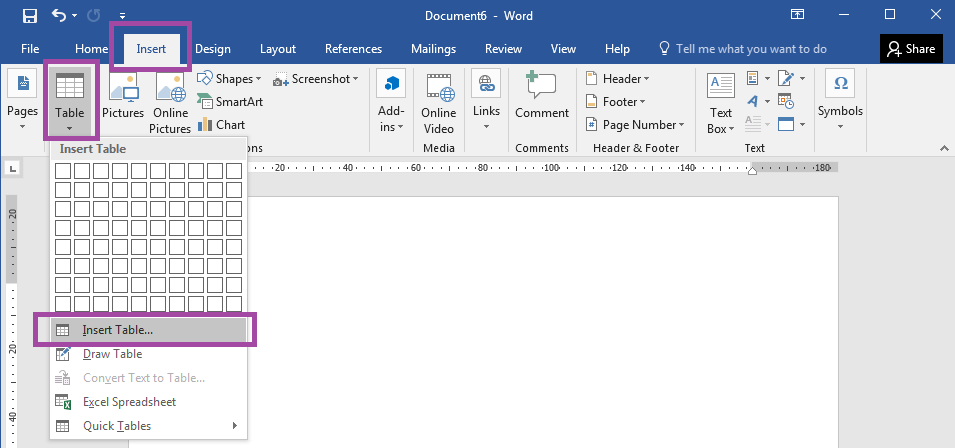
To insert a Table, click on the “Insert” tab at the top of the page, select “Table”, and click on “Insert Table”. Enter the number of rows and columns that you need and click “OK”.
TABLE TOOLS – Setting Up Your Table
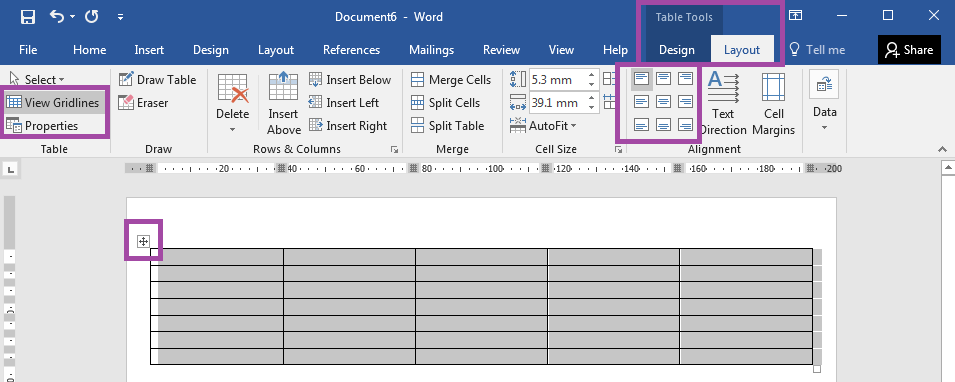
You should now have a table with the correct number of rows and columns to represent your A4 labels. The table will have solid black borders, which need to be removed so they don’t print out as part of your label template. Select your entire table by moving your cursor to the top left of the table and left clicking on the four headed arrow icon. This will add two Table Tools tabs to the top of your window. Click on “Design”, then “Borders” and select “No Borders” from the list. Your table should now be outlined with a dotted grey line.
If you cannot see your table at all, you have Table Gridlines turned off. Go to the “Layout” tab and click on “View Gridlines”.

Now you need to set up your table with the correct measurements and formatting options.
The easiest way to do this is to use the “Properties” button, which can be found on the left hand side of the Table Tools “Layout” tab. Alternatively, you can right click on your table and select “Table Properties” from the list of options. Go through each of the tabs in Table Properties as follows:
TABLE TAB:
- SIZE: set the preferred width to the total width of your blank labels (i.e. from the left edge of the first label in the top row to the right edge of the last label in the top tow). For example, our LP21/63 label size is made up of 3 blank labels with a width of 63.5mm each and 2 gaps with a width of 2.5mm each – creating a total width of 195.5mm.
- ALIGNMENT: set the alignment to “Center”.
- OPTIONS: make sure that all of the cell margins are set to 0mm, that there is no spacing between the cells, and that “Automatically resize to fit contents” is turned OFF.
ROW TAB:
- SIZE: enter the height of the top row and set the drop down box to “Exactly”.
- OPTIONS: make sure both options are turned off.
- If there are any gaps between your rows, use the “Next Row” button to tab through and change the height of the gap rows as required.
COLUMN TAB:
- SIZE: enter the width of the first column.
- If there are any gaps between your columns, use the “Next Column” button to tab through and change the width of the gap columns as required.
For example, for the LP21/63 label size you need to alternate the widths between the 63.5mm width of the blank labels and the 2.5mm width of the gaps between the columns.
CELL TAB:
- ALIGNMENT: we recommend using“Center” but this ultimately depends on the alignment that you want to use for your label design.
- OPTIONS: make sure that the cells margins are set to “Same as the whole table” and that the “Wrap text” option is selected (and that “Fit text” is not selected).
Finally, we recommend centralising the alignment of your entire table (so that your content will be added to the centre of each blank label). Click on the Table Tools “Layout” tab and select the middle icon in the set of nine alignment options towards the right hand side.
TABLE TOOLS – Save Your Label Template
Your label template is now ready to go! We recommend saving a copy of your blank label template now so that you can use it for future label designs (or get back to a clean slate if you need to!).
 Label Planet