How To Print A Sheet Of Address Labels With Create Labels In Word
How to use Word’s Create Labels tool to quickly print a sheet of address labels.
Here at Label Planet, we supply labels on sheets and provide free label templates for Word for all of our label sizes. If you need to create your own label template in Word, here's a step by step guide explaining how to use Word’s built-in Create Labels tool to quickly and easily set up a template to print a sheet of self adhesive labels with your required address. This method is only suitable for printing a sheet of sticky labels with the SAME address.
Watch a video: this advice is also available in video format.
View our step by step How To video to learn how to make label templates using Word's Create Labels tool.
CREATE LABELS – STEP ONE: OPEN THE CREATE LABELS TOOL
- Open Word and create a new Blank Document.
- Click on the MAILINGS tab at the top of the page.
- In the “Create” section on the left hand side of the ribbon, click on LABELS.
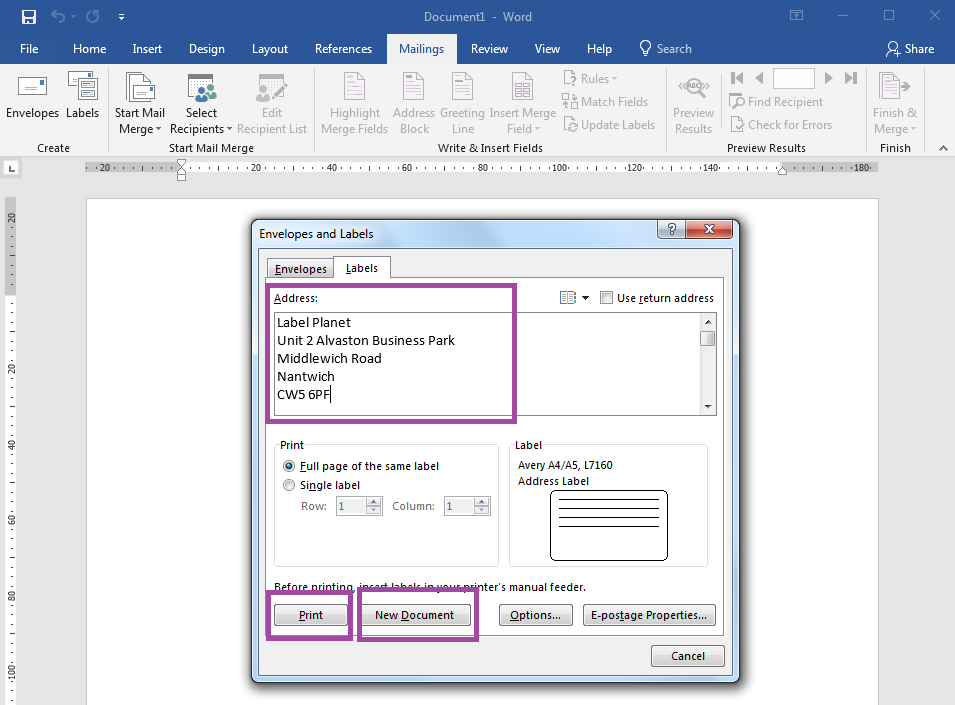
The “Create Labels” tool will now appear on your screen as box entitled “Envelopes and Labels”.
CREATE LABELS – STEP TWO: SELECT A COMPATIBLE LABEL TEMPLATE
- Click on the OPTIONS button. This opens a new box entitled “Label Options”.
- “Printer information” must be set to PAGE PRINTERS and “Tray” must be set to your media bypass tray – if your printer has one.
- Select the correct “Label vendor” (e.g. A4/A5).
- Select a compatible template code from the list and click OK.
NB: if your A4 labels don’t have a compatible template, you need to click on NEW LABEL and set up your own label template. You can find instructions on how to do this here.
CREATE LABELS – STEP THREE: ENTER YOUR ADDRESS
- Type your address into the ADDRESS BOX.
If you simply want a plain sheet of address labels, you can now load your A4 labels into your printer and press print.

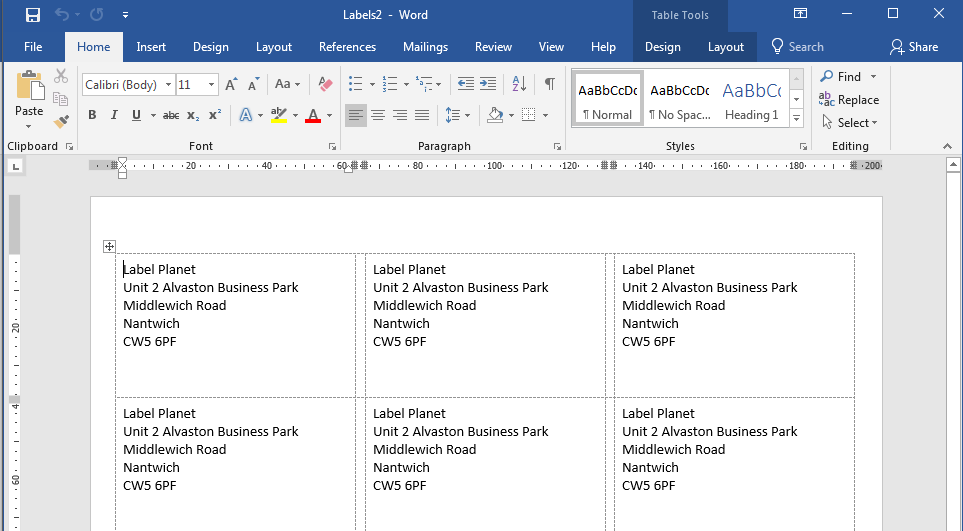
- To alter the design of your address labels (e.g. by adding a border, background, image or changing the font style), click on NEW DOCUMENT. This will open a new document containing a label template with your address added into each blank label.

CREATE LABELS – STEP FOUR: PRINT YOUR LABEL TEMPLATE
As mentioned above, if you are printing plain address labels you simply press the print button. If you have created a new label template document to add more design work to your address labels, you have more control over the print process. We recommend following these steps:
- Press FILE and then PRINT to get to the print preview page. Click on PRINTER PROPERTIES and confirm the following;
- The page size is set to A4.
- No scaling options are set (e.g. less than 100% or “Fit to Page/Sheet”).
- No options such as “Use Default/Driver Settings” or “Ignore Printer Settings” are selected.
- Test print your address labels by loading blank paper into your printer. Hold your test print against a sheet of your blank labels and hold both up to a light source to confirm that the alignment is correct. You can then make any necessary adjustments before you…
- Load your sheet labels into the media bypass tray (if your printer has one) and print your address labels.
We highly recommend using this method (rather than printing directly from the Create Labels tool). It gives you easy access to your printer’s print settings and lets you perform a test print. Without these options, you may find that you end up with a set of misaligned (and unusable) address labels.
 Label Planet