How And Why You Should Use Text Boxes In Word Label Templates
Find out why text boxes are so useful when it comes to designing labels in Word.
You might think that it’s far easier to simply type your text into your template. Or just use copy and paste.
However, there are some benefits to using text boxes in Word label templates that might just make you reconsider. Especially if you want your label design to contain lots of different sections or areas of text.
View our How To video for a step by step guide to working with text (and images) in Word label templates.
USING TEXT BOXES IN WORD LABEL TEMPLATES – THE BENEFITS
There are two main benefits to using text boxes instead of simply typing in your text.
- You can get greater control over the positioning of specific areas of text.
- You can take advantage of the text box formatting tools to add additional design elements.
The former applies to label designs made up of multiple elements.
For example, you may have a design containing an image and some text. Putting your text into a text box creates two single objects that you can format and position. This is easier than trying to position an image relative to text that you have typed into your template. It can also give you greater control over the positioning of both elements, provide more formatting options, and allow you to create more sophisticated designs made up of overlapping layers.
Alternatively, you might have a bunch of text that you want to break up into separate sections, which you can then individually position around your design. For example, you might want a product name at the top, product information in the bottom left corner, and company information in the bottom right corner. You could try typing in all of that information and then manually spacing it out to create your required layout. A better solution is to use three separate text boxes, which you can edit and position independently of each other.
When you create a text box, you also gain a few extra formatting options. For example, you can format the text itself, as well as the border, background, and shaping of your text box. Word has a variety of formats and effects that you can apply to your text AND your text box to make your design really stand out.
USING TEXT BOXES IN WORD LABEL TEMPLATES – INSERTING A TEXT BOX (AND TEXT)

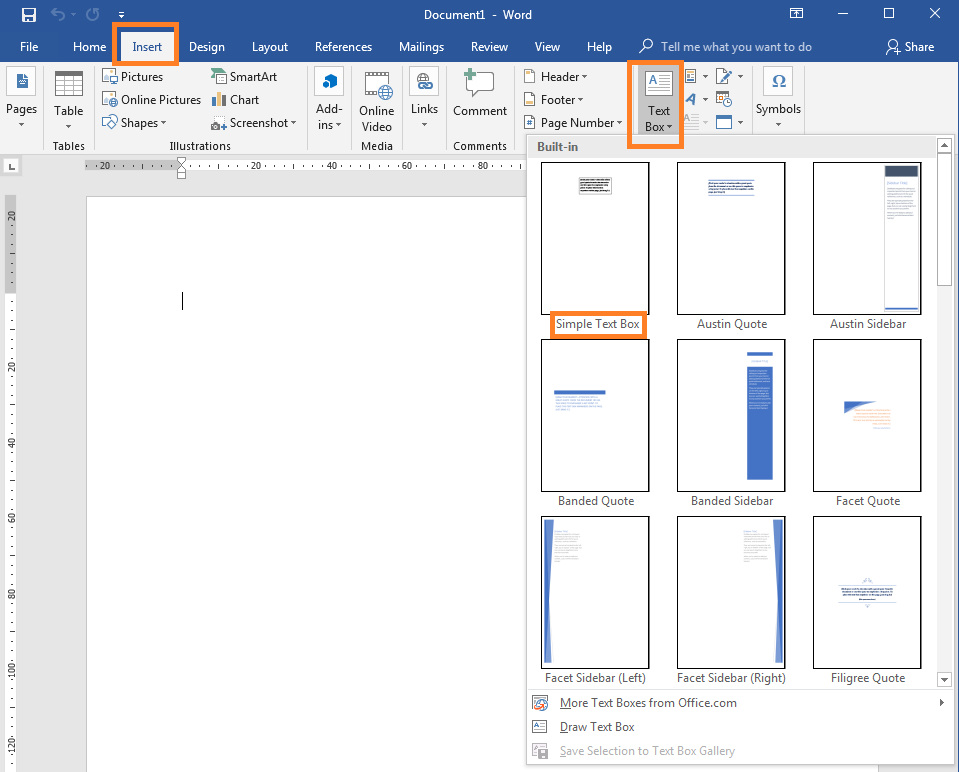
To insert a text box, click on the Insert tab at the top of the page and select Text Box. Word will give you a number of pre-formatted options along with a basic text box. If you like the look of one of the existing options, select it from the list (you can change the formatting later). Alternatively, choose the basic “Simple Text Box” so you have a blank canvas onto which you can add your own design elements. The simple text box contains placeholder text. Simply delete this out of the way and type in your required text.
USING TEXT BOXES IN WORD LABEL TEMPLATES – FORMATTING A TEXT BOX (AND/OR ITS TEXT)
Next, you’ll need to format your text box (and text) to make it look the part for your required design.
There are a number of ways you can format your text box (and text). For some of these, you’ll need to remember that the text box and the text within it are two separate elements forming a whole. Some formatting options will affect BOTH elements. Others will only apply to the text or the text box.

FORMATTING A TEXT BOX (AND/OR ITS TEXT) – The Size
Left click on your text box once to select it. You can then change the size of the text box in two ways.
- MANUALLY RESIZE: click on one of the sizing handles at the corners or middle of each edge. Hold down the left button and then move your cursor to increase or decrease the size of your text box before releasing the button. The corner handles allow you to change the width and height simultaneously, while the middle handles can only change one measurement at a time.
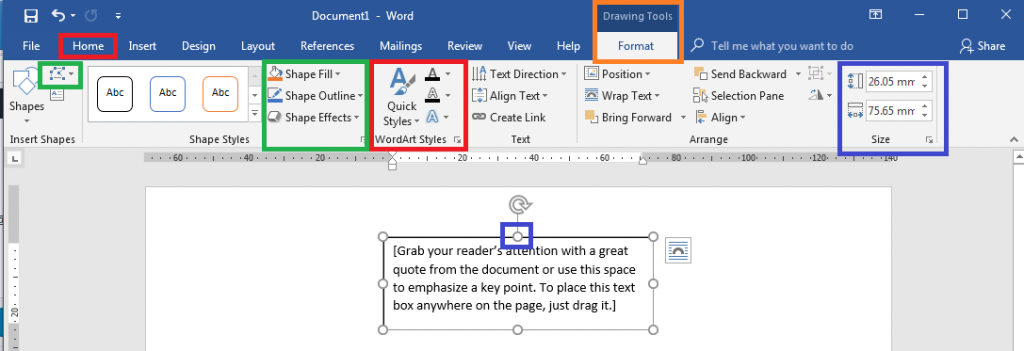
- USE THE SIZE TOOL: the size of your text box is displayed on the right hand side of the Drawing Tools Format tab. Change the measurements in the width and height boxes to change the size of your text box. This can be a more precise way to resize your text box, compared to doing it manually.
FORMATTING A TEXT BOX (AND/OR ITS TEXT) – The Text
Left click once on your text box to select it (and the text inside). You can make basic formatting changes using the Font Tools under the Home tab. For example, you can change the font, font size, font colour, and add emphasis (e.g. bold, italics, etc).
For more formatting options, use the Drawing Tools Format tab. In the WordArt Styles section, you will see plenty of formatting options that apply to the text itself.
This includes pre-formatted options as well as formatting tools that allow you to change the colour of your text, add a border to your text, and add shaping to your text. For example, you can add shadowing, reflections, glow and bevel effects, rotate your text, or use one of the “Transform” options to warp the shape of your text or make it follow a circular/semi-circular path.
FORMATTING A TEXT BOX (AND/OR ITS TEXT) – The Text Box
Tools in the Shape Styles section of the Drawing Tools Format tab allow you to format the text box itself. You can change the fill (background) of your text box, the outlines (border), and add shaping. For example, shadowing, reflections, glow and bevel effects, soft edges, and rotation effects.
You may need to change the background and border of your text box if you are creating a layered design. By default, text boxes have a solid white background and a black border. If your text box sits over another element – particularly one of a different colour – you need to make the background transparent and remove the border.
Select your text box and click on the Drawing Tools Format tab. To add a transparent background, click on Shape Fill and select No Fill. To remove the border, click on Shape Outline and select No Outline. Both of these are listed in the Shape Styles section of the ribbon.
Please note that adding a border to a text box will increase its overall size. You may need to bear this in mind if you are trying to create a border around the edges of your sticky labels or if your text box sits close to the edges of your blank labels – as your text box may end up being too big to sit in the correct position for your required design.
The “Edit Shape” option in the Insert Shapes section can be used to add a particular shape to your text box. This can be extremely useful if you are creating text boxes for use in sticky labels that have a particular shape – e.g. round labels / circular labels and oval labels.
By default, text boxes are given a Wrap Text format of “Square”. This should offer enough flexibility when positioning your text box within your label template. If you can’t position your text box as you’d like, try using “Tight”.
USING TEXT BOXES IN WORD LABEL TEMPLATES – LAYERING TEXT BOXES
To layer your text boxes above or below other elements in your design, use the Bring Forward and Send Backward options in the Drawing Tools Format tab. Each one provides you with three options:
- “Bring Forward” / “Send Backward” moves your text box forward or backward by one layer. I.e. it will move in front of or behind the adjacent layer/element.
- “Bring To Front” / “Send To Back” makes your text box the topmost or bottommost element regardless of how many elements you have layered above or below your selected text box.
- “Bring In Front Of Text” / “Send Behind Text” moves your text box so that it sits in front of or behind other elements that contain text.
 Label Planet