Designing A Label Template – Copy & Paste 102
How to use copy and paste to create label designs quickly and accurately.
This post is all about ways you can combine copy and paste to create a label template quickly and accurately.
View our How To video for a step by step guide to completing label templates using copy and paste in Word.
All of our label products are supplied on A4 sheets, which means that all of our label templates represent the layout of all of the labels on a particular sheet. When creating a set of labels that are all the same (or that share common design features), we strongly recommend adding your design to the top left label first and then using copy and paste to add this design to the rest of your labels.
We recommend this particular method for TWO key reasons:
- It’s a lot quicker than setting up your label design from scratch in every single label – especially if you are printing a label size that is rather small and so features a lot of labels on a single sheet.
- It allows you to create a more accurate template; if you set up your design in each label from scratch there is a possibility that you won’t set it up in exactly the same way and in exactly the same position each time – which could result in slight misliagnments when you print your labels. If, however, you set up your design once and then use copy and paste to replicate that design in exactly the same way and position in the rest of your labels then you know for certain that your template is as accurate as it can possibly be across the whole sheet.
Selecting and copying your design
As we mentioned in last week’s post, you need to select ALL of your label design (including any formatting options you have chosen to use).
In Word, you can do this by moving your cursor to the bottom left corner of the label and then quickly triple clicking the left button on your mouse.
Next, you copy the contents of that label by either clicking on the “Copy” option in the appropriate menu (in Word, copy is listed under the “Home” tab in the ribbon) OR by using the keyboard shortcut of Control Key (Ctrl) + C [Windows] or Command Key (⌘) + C [Mac].
Selecting the rest of your labels and pasting your design into them
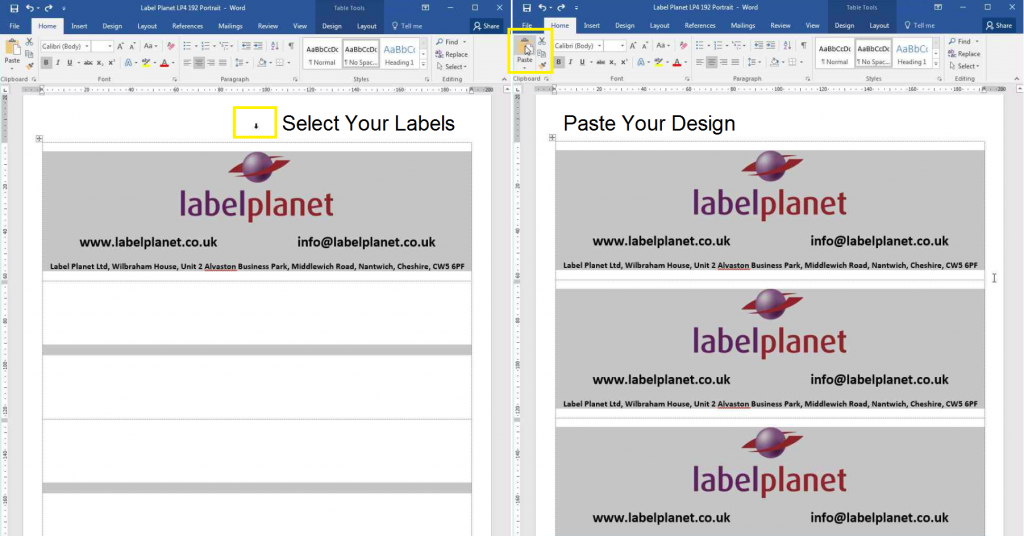
This step may be more or less complicated depending on the layout of your label sheets. If there are no gaps between your labels you can simply select all of the labels using the point and click method or the click and drag method and paste your design into the rest of your labels in one go.
However, if there are any gaps between your labels you cannot select the whole template because this will result in your design being pasted into the labels AND the gaps between them – ruining the alignment of your template.
In order to use copy and paste to transfer your design into MULTIPLE labels at once you MUST take care when selecting the destinations for your copied design; the area(s) that you select must MATCH the area(s) that you have copied or you will end up pasting your design into the wrong place(s).
Selecting labels & pasting your design in a template with no gaps between labels:
Use the point and click method or the click and drag method to select (and highlight) all of the labels in your template. Click on the “Paste” option in the appropriate menu (in Word, paste is listed under the “Home” tab in the ribbon) OR use the keyboard shortcut of Control Key (Ctrl) + V [Windows] or Command Key (⌘) + V [Mac].

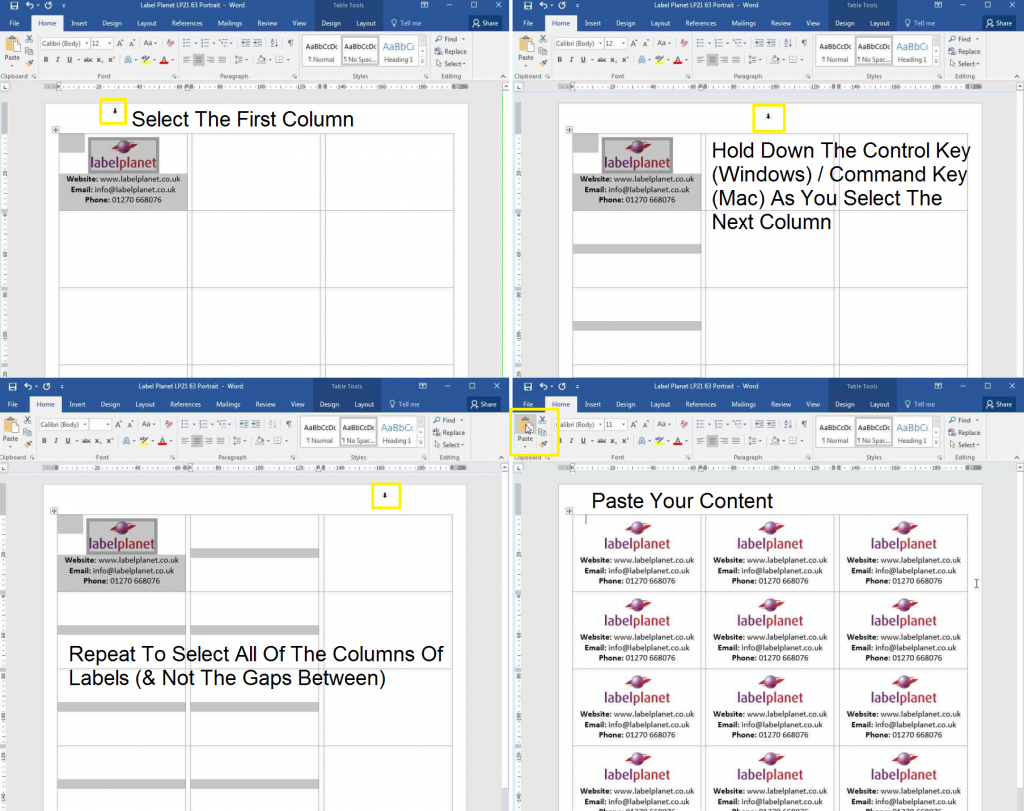
Selecting labels & pasting your design in a template with gaps between the columns of labels only:
Use the point and click method to select all of the label columns (avoiding the gap columns). Position your cursor above the first label column until it turns into a small solid black arrow pointing downwards and left click once, then move your cursor above the next label column and hold down the Control Key (Ctrl) [Windows] or Command Key (⌘) [Mac] as you select that label column, and so on until all of the label columns are selected. Then you can paste your design as described above.

Selecting labels & pasting your design in a template with gaps between the columns and rows of labels:
This is the most complicated label layout to paste into because you cannot select entire rows or columns (as you will end up selecting and pasting your design into the gaps between the labels as well as into the labels themselves). However, if you get a bit creative with your selection process and the copy and paste function you can speed things up a bit.
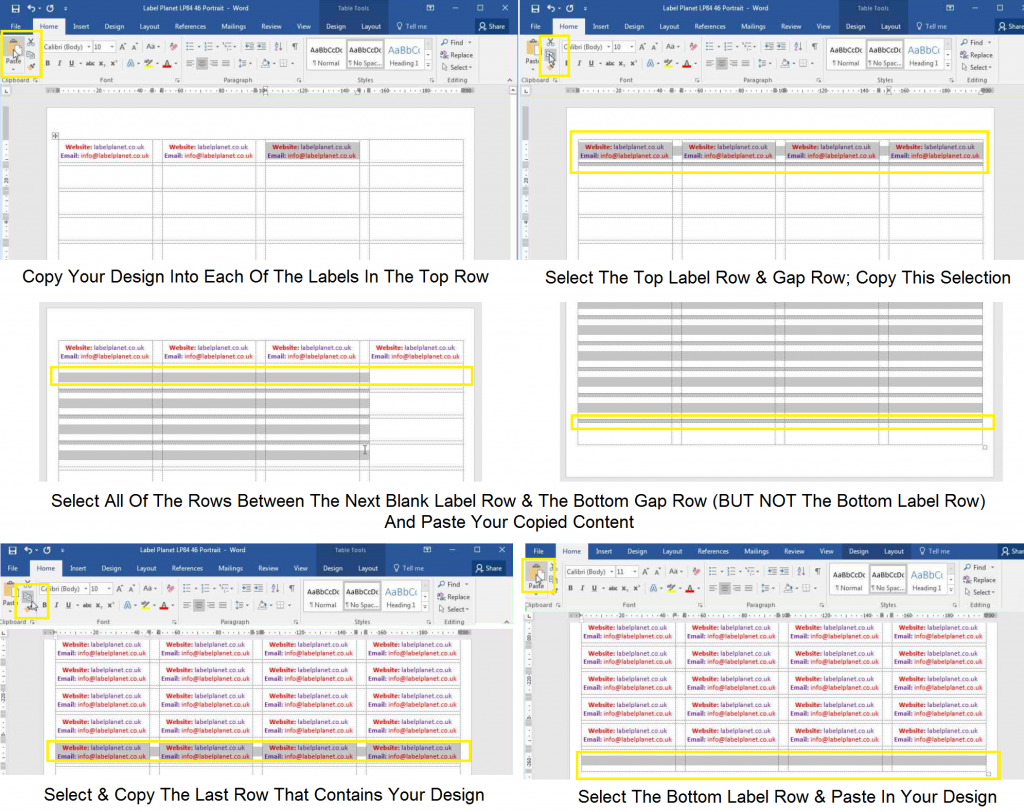
For example, our LP84/46 label size has gaps between the rows and columns. To copy and paste your label design into all of your labels faster than simply pasting into each one individually, follow these simple steps:
- Copy and paste your design into each of the labels in the top row (one by one).
- Use the click and drag method to select the top TWO rows (this is the top label row and the gap row below it) and copy this selection.
- Select the remaining label rows and gap rows EXCEPT for the bottom label row.
- Paste your copied area into those rows.
- Select the last row that contains your label design and copy that row.
- Select the blank bottom label row and paste in your copied area to complete your template.

You can adapt this method however you like to fill in any template where there are gaps between the rows and columns of labels BUT REMEMBER you must match the area you are pasting into with the area that you have copied. For example, if you copy a row of labels and a gap row then the area you paste into must start with a row of labels and end with a gap row – if you copy a label row, the gap row below it, and the label row below that, then you can only paste into an area that contains one label row, the gap row below it, and the label row below that.
Hopefully, you should now be an expert in combining careful selection with copy and paste to create accurate label templates much faster than re-creating your label design in each and every label on your sheet.
 Label Planet