Designing A Label Template – Getting Things In Line With The Perfect Alignment
Learn why alignment is so important to designing and printing label templates.
When it comes to label templates there are two kinds of alignment to contend with; first there is the way that your design is aligned within each label and second is the way that your template is aligned on your label sheets when you print your template. As we are currently looking at designing label templates, today’s Template Tuesday will deal with the former form of alignment to help you to create a decorative and professional looking design that is also practical when it comes to getting your printed alignment just right.
Alignment basically refers to the spacing of two or more items and how they are positioned relative to one another (and possibly any other elements around them). For templates, there are two key elements that need to be aligned:
- The Template Itself; while most label sheets are centrally aligned (i.e. the labels sit in the middle of the sheet so that the top and bottom page margins and the left and right page margins are equal), some are made with an off-centre alignment (causing the page margins to be unequal).
In this case, alignment refers to how the labels are positioned relative to the A4 sheet.
- The Content Of The Template; you can choose how you want your design to be aligned within each label – you could centralise your design (so it sits in the middle of each label) or you could choose an off-centre alignment (so it sits closer to one of the edges of each label). You can also give each element within your design its own alignment in order to position all of the elements in a specific way to create the overall layout that you want for your design.
In this case, alignment refers to how your design and each element within your design is positioned relative to each label or the other elements within your design.
Generally speaking, you won’t need to worry about the alignment of the template itself as this should already have been established for you by the supplier of the template. When it comes to aligning the content of your template, however, the choice is yours and there are a few different options to choose from. In fact, there are NINE alignment options you can choose, based on where your design or element begins vertically (i.e. if it is positioned towards the top, centre, or bottom of a label) and horizontally (i.e. if it is positioned towards the left, centre, or right of a label):
Align Top Left: your design starts from the top left corner of each label.
Align Top Centre: your design starts from the centre of the top edge of each label.
Align Top Right: your design starts from the top right corner of each label.
Align Centre Left: your design starts from the centre of the left edge of each label.
Align Centre: your design starts from the centre of each label.
Align Centre Right: your design starts from the centre of the right edge of each label.
Align Bottom Left: your design starts from the bottom left corner of each label.
Align Bottom Centre: your design starts from the centre of the bottom edge of each label.
Align Bottom Right: your design starts from the bottom right corner of each label.
When designing a label template, you can usually choose to set an overall alignment for your template (so that any element you add should automatically be given that same alignment) and you can set individual alignments for each of the elements within your design.
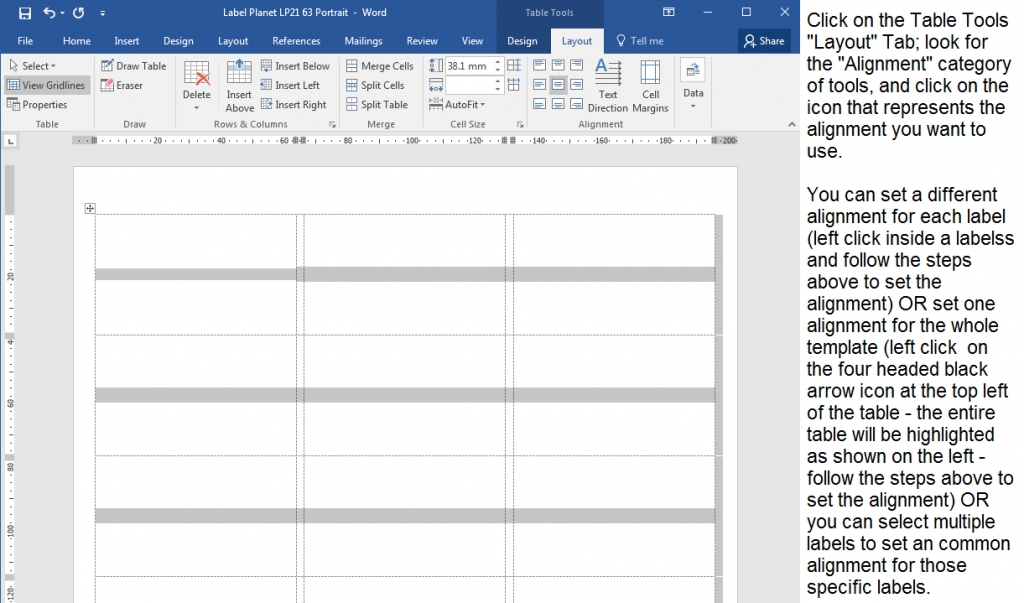
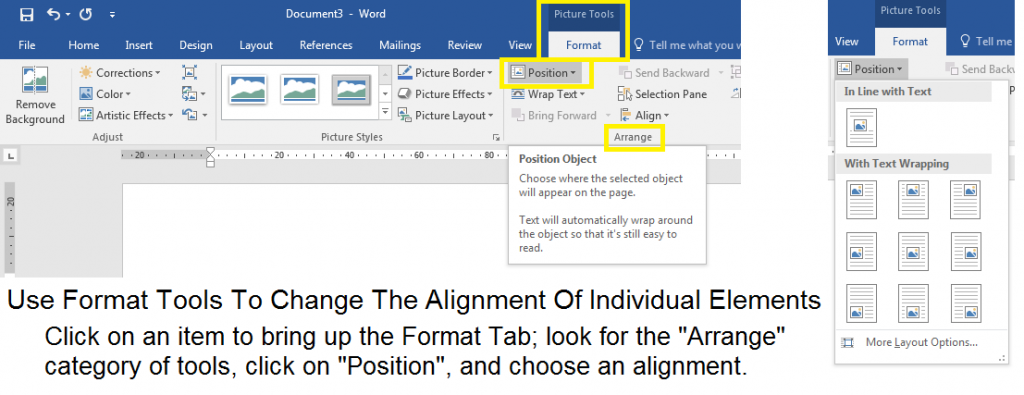
For example, in a Word template, you can set an overall alignment for your template (and therefore the design that you add to it) by using the alignment tool under the Table Tools Layout Tab AND you can also set individual alignments for the elements that make up your design (including images, text boxes and shapes, and text) by using the alignment tool under the Picture Tools Format Tab / Drawing Tools Format Tab / Home Tab (respectively).
SET AN OVERALL ALIGNMENT FOR YOUR DESIGN

SET AN ALIGNMENT FOR INDIVIDUAL ELEMENTS WITHIN YOUR DESIGN

While you can choose whatever alignment you prefer, we recommend using a centralised layout if possible. This is because this particular alignment causes your design to start in the centre of each label and to expand outwards from this central point; this can help to prevent problems with parts of your design sitting too close to the edges of your labels (which may result in some parts being cut off when you print your labels), helps to prevent white edging around the edges of your labels (because your coloured background doesn’t sit in the right place to cover the entirety of each label), and gives a well balanced look to your label design.
Obviously, we strongly recommend that – whatever alignment you choose – you should always do a test print before printing onto your labels so that you can confirm that your template and printer will produce the correct alignment on your labels AND that the alignment of your design fits practically and attractively inside each label.
 Label Planet