Our guide to Word's design tools that are suitable for designing labels.
While Word is primarily designed to work with text, it also contains plenty of design tools that come in handy when you need to create a label design in Word label templates.

What Design Tools Are Available In Word?
Word groups its tools into categories and so the design tools you might need to create and print label templates can be found in a number of places, including:
- The HOME tab: here you’ll find design tools related to text. These tools allow you to select the font, colour, emphasis, position etc of your text. It also contains the cut, copy, and paste tools, which come in VERY handy when you need to copy your design from one label into the rest of your template (or when adding elements from external sources).
- The INSERT tab: here you’ll find design tools that allow you to add design elements, such as tables, pictures, shapes, text boxes, and WordArt to your template.
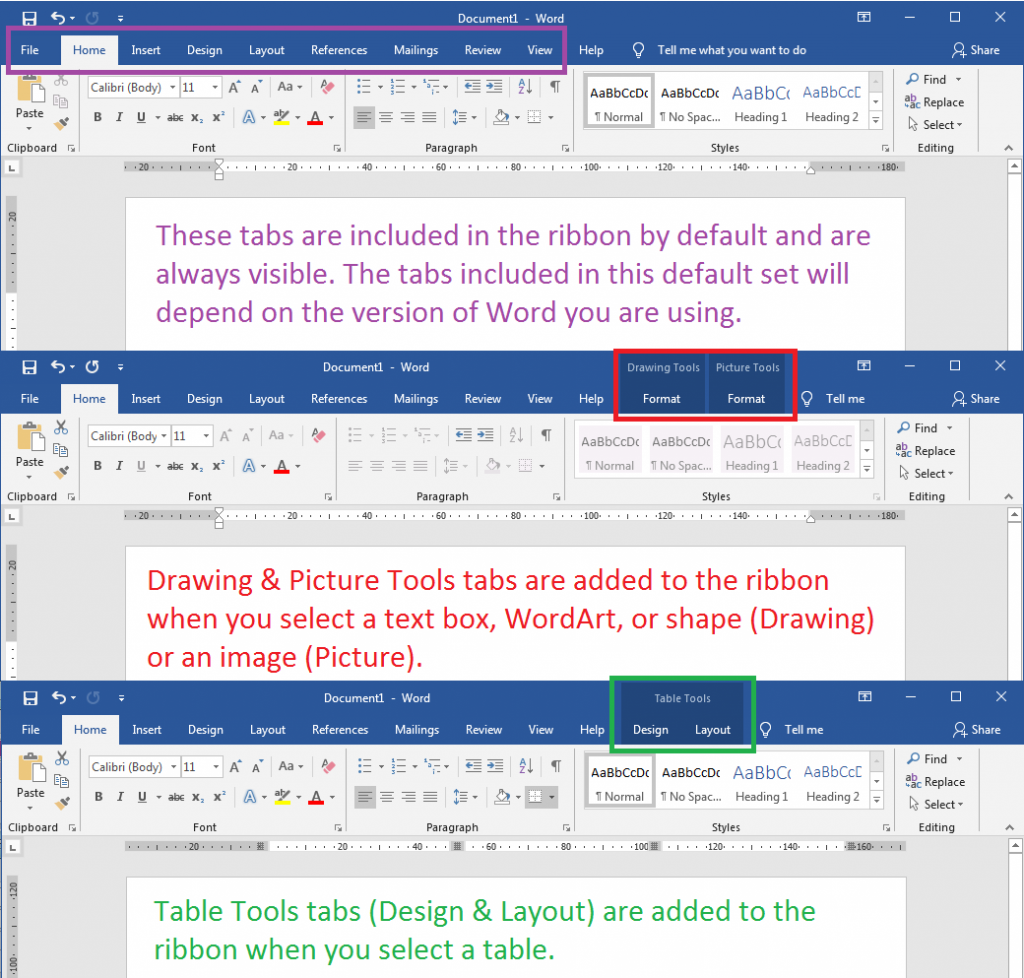
- “TOOLS” tabs: these are more specialised tabs, which allow you to format specific objects. They include Table Tools (including a Design tab and a Layout tab to format tables), Drawing Tools (for formatting text boxes, WordArt, and shapes), and Picture Tools (for formatting images).
All of these tabs are displayed at the top of the page in a bar called the “ribbon”. These tabs are broken up into two types – general use tabs, which are always included in the ribbon, and tools tabs, which contain tools related to specific objects and will only be included in the ribbon when one of those objects is selected.

How To Find & Use Text Design Tools
If you need to edit “basic text” (i.e. text you simply type into the template itself and not text added in a text box or as WordArt), you need to select the “Home” tab at the top of the page.
To use these tools, first select / highlight the text you want to format. The simplest way to do this is to use your mouse / cursor. Move the cursor to the start of the text, then press and hold down the left button on your mouse (or press and hold down the touchpad) as you move your cursor to the end of the text, and release the button. The text you have selected will now be highlighted with a grey background.
You can then use the tool icons in the Home tab to make changes to your text, such as the font, size, colour, emphasis, alignment, and position.
If you need to edit text that you have added using a text box or WordArt, you can use the tools in the Home tab OR you can use the more advanced tools displayed under the Drawing Tools Format tab. In either case, you will first need to select your text box or WordArt by left clicking on it once. This will add the Drawing Tools Format tab to the ribbon at the top of the page.
You can use the tool icons in the Home tab to make basic changes to your text or you can use the tools in the Drawing Tools tab to apply more advanced design formatting, such as shaping, shape effects, text effects, and arrangement (allowing you to layer different elements to build up your final design).
How To Find & Use Image Design Tools
To edit shapes, you need to use the Drawing Tools tab as mentioned in the paragraph above.
To edit pictures and images, you need to use the Picture Tools Format tab, which can be found in a similar way. Left click on your picture or image and this will add the Picture Tools tab to the ribbon at the top of the page.
You can then use the tools in the Picture Tools tab to make picture corrections, adjust the colour, apply effects and styles, and select the alignment and positioning of your image(s).
How To Find & Use Table Design Tools
Word label templates are basically an A4 page containing a table. The table represents the layout of your labels; each cell represents either a label OR a gap between two labels. This means that you might need to use table design tools.
To access the TWO table design tabs (Design & Layout), you can select the entire table or click anywhere inside the table, which will add the two Table Tools tabs to the ribbon.
If you simply left click somewhere inside the table (carefully avoiding any design elements that you have already added), the two Table Tools tabs will appear – any changes you make using tools from these tabs will generally only be applied to the cell that you have clicked within.
If you select the whole template, however, any changes you make will apply to the whole table. To select the whole table, move your cursor to the top left corner. An icon containing a four headed black arrow should appear – left click on this once to select the whole table.
The design tab allows you to apply styles to your table or to add shading / borders.
Top Tip: we advise AGAINST adding borders to label templates in this way. The Table Tools border tool usually INCREASES the size of your table – changing the alignment you get when you print your template.
The layout tab allows you to format the layout and alignment of the table.
Top Tip: ideally you shouldn’t need to adjust the layout. If you do need to do so, do take care when making adjustments as these tools can influence the overall alignment of label templates.
View our How To video for a step by step guide to working with text and images in Word label templates.
 Label Planet