Troubleshooting Tips – Word’s Mail Merge Tool
Our guide to the most common problems encountered when using Word's Mail Merge tool.
View our How To video for a step by step guide to using Mail Merge to make labels.
This post will take you through some of the most common problems that people encounter when using the Mail Merge tool and provide troubleshooting tips and tricks to put things right.
TROUBLESHOOTING TIPS – Finding A Compatible Template Code
Word contains LOTS of built-in templates, which can make it tricky to find the one you need.
Make sure PRINTER is set to PAGE PRINTERS and you have chosen the correct LABEL VENDOR (e.g. A4/A5).
The list contains codes that are numbers OR that start (and end) with a letter. Get closer to your required template code by left clicking on on one of the codes in the list. Then type the first number or letter of your code using your keyboard. The list will jump down to codes that start with that number or letter. You can then scroll down to find your required code.
If you cannot find your code, double check that you have the right code.
If you still cannot find the code you need, it may relate to a product that has been discontinued. Microsoft periodically removes discontinued templates from Word. You will need to create your own label template or download a standalone template.
TROUBLESHOOTING TIPS – No Next Record Rule In Your Label Template
If you have used a standalone label template, the Wizard will NOT add the next record rule for you. Word does not recognise standalone label templates as label templates. It will only recognise its own built-in templates OR label templates to create using Word’s “Create Labels” tool.
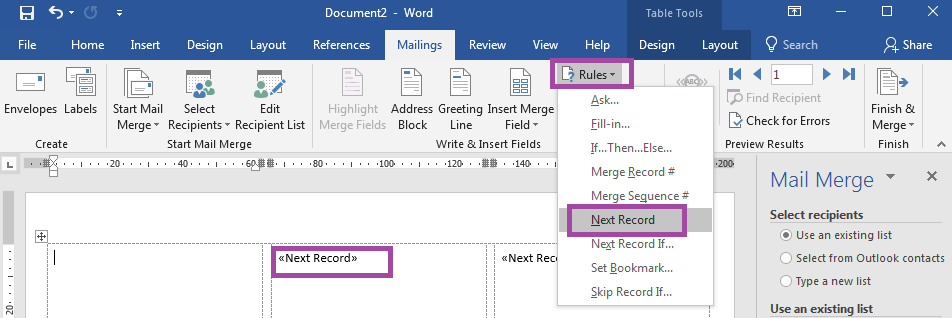
You must add this rule to each of the blank labels in your template – except the first one. Click inside the second blank label. Next click on the RULES option in the MAILINGS tab at the top of the page. Select NEXT RECORD from the list. Repeat this process for the rest of your blank labels (or use copy and paste to add the rule into the rest of your template).

TROUBLESHOOTING TIPS – Address Block Doesn’t Show Your Addresses Properly
If you use the Address Block to add in placeholders for your addresses, you may find that it only picks up parts of each address OR puts your addresses in the wrong order OR uses the wrong format.
The address block tool contains options to correct all of these issues.
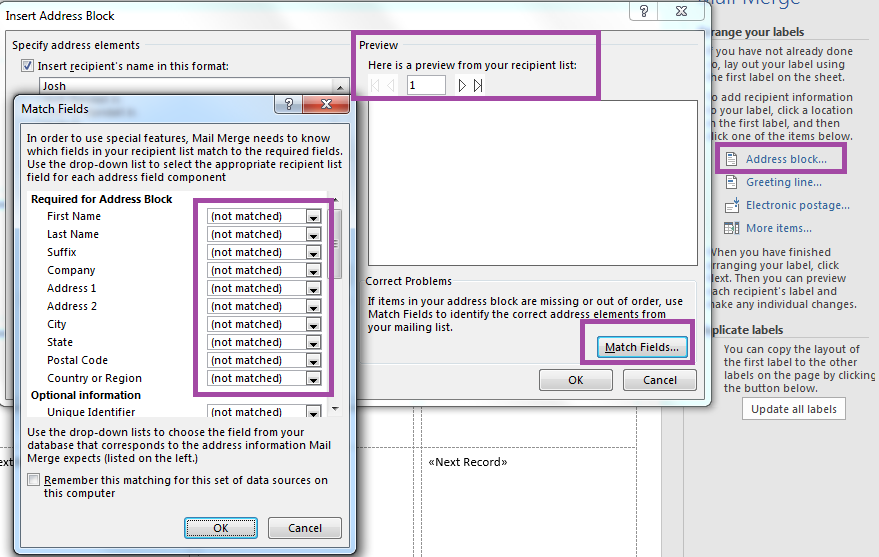
In particular, you may need to use the MATCH FIELDS button. This allows you to manually link columns in your data source with each section of the address block. For example, Word uses the title “Address 1” for the first line of addresses. If you use a different title Word may not pick up that part of each address. Use the drop down boxes to match your columns and then click OK. Use the preview panel to make sure your addresses will now appear properly.

TROUBLESHOOTING TIPS – Preview Doesn’t Show A Different Address On Each Label
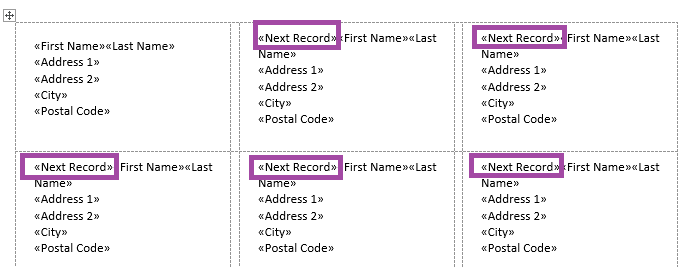
When you preview your address labels, each label should show a different address from your list. If this is not the case, it is likely that your Next Record rules haven’t been added correctly. Go back a step and make sure there is a Next Record rule in ALL of the blank labels – except the first one.

You also need to make sure that the Next Record rule comes before the first placeholder in your design. This rule tells your label template when to start using information from the next record in your list. If it is missing OR comes after your placeholders, your address labels will be filled in using information from the previous record.
TROUBLESHOOTING TIPS – Some Addresses Don’t Fit On Your Labels
While most addresses will be of a similar length, some may require additional lines. These addresses may come partway through your list of addresses – meaning that you might not notice them until you have already printed your address labels. This is why we recommend checking how the longest address in your list appears in the Preview Your Labels step. You can find an specific address using the FIND A RECIPIENT option in the Wizard Panel.
If you have a handful of addresses that take up too much room, try editing these addresses to make them fit. Use the EDIT RECIPIENT LIST option on the Preview Your Labels step OR use the EDIT INDIVIDUAL LABELS option on the Complete The Merge step. Alternatively, go back to the Arrange Your Labels step and alter your design to allow all of your address to fit onto your address labels.
TROUBLESHOOTING TIPS – Printed Address Labels Are Misaligned
We recommend always doing a test print before printing your complete set of address labels. This allows you to check for alignment issues (and fix them) without wasting your sticky labels. If you have alignment issues, you should be able to resolve them using these troubleshooting tips…
THE MISALIGNMENT IS IN THE SAME DIRECTION BY THE SAME AMOUNT
Adjust your printer’s starting print position by changing the page margins of your label template. Click on the LAYOUT tab at the top of the page. Click on MARGINS and select CUSTOM MARGINS. Decrease the top page margin if your address labels are too low. Increase the top page margin if they are too high. If they are too far left, increase the left page margin. Too far right and you need to decrease the left page margin.
THE MISALIGNMENT GETS WORSE DOWN/ACROSS/MOVING OUT FROM THE CENTRE OF THE SHEET
Adjust your printer’s print settings. This issue is usually caused by your printer scaling your template to a page size larger or smaller than A4. Before printing, go into Printer Properties and confirm that:
- The page size is set to A4.
- No scaling options are applied (e.g. less than 100% or “fit to…”).
- No options such as “Ignore Printer Settings” or “Use Default/Driver Settings” are selected.
If this doesn’t help, double check that the measurements of your label template match your address labels. You may then need to use an alternative label template OR adjust the sizing of your label template. Word label templates are basically tables, where the cells represent the blanks labels (and any gaps between them). Use the TABLE TOOLS LAYOUT tab to adjust your label template.
TROUBLESHOOTING TIPS – Broken Link Between Your Template & Data Source
Your label template and your data source are linked. So, if you delete, rename, or move your data source, your label template will no longer be able to merge with that data. You can relink your template to your data source (or link it to a new data source) by clicking on Mailings and choosing Select Recipients.
TROUBLESHOOTING TIPS – Data Changes Don't Appear In Your Template
Your label template cannot process any changes that you make to your data source in real time. You will need to save your updated data source and then re-open your label template.
TROUBLESHOOTING TIPS – Template Won't Print Beyond One Page Of Labels
If you are using a merged template that you have saved for reuse, you need to keep using the print options listed under the Mailings tab. If you try to use the normal way of printing (via File and Print), you will only be able to print the one page of labels already visible on your screen. You need to click on the Mailings tab and select Finish & Merge to view all of the print options for your merged document.
 Label Planet