How To Print Christmas Labels Using Word’s Mail Merge Tool
Yes, it is that time of year once again, where we revisit Word’s Mail Merge Tool!
Each year we guide you through the process of creating Christmas labels using a Word template and a database (e.g. an Excel Spreadsheet). If you’ve got a list of addresses or a product database that you’d like to turn into Christmas Address Labels or Christmas Product Labels but aren’t sure how to go about setting up a mail merge, this is the blog post for you!
We recommend using the built in “Step By Step Mail Merge Wizard” and so this blog will describe how to complete a mail merge using the Wizard; if you wish, you can choose to do the steps manually.
Watch a video: this advice is also available in video format.
View our step by step How To video to learn how to use mail merge to make labels.
Things you will need before you start:
- A saved database, such as an Excel spreadsheet, that contains the information you want to include on your labels (e.g. addresses or product details)
- A built-in template code that matches your labels, the measurements of your labels, OR a saved copy of a Word template that matches your labels (e.g. one that you have downloaded from our template section!)
GETTING STARTED – Enter the “Step By Step Mail Merge Wizard”

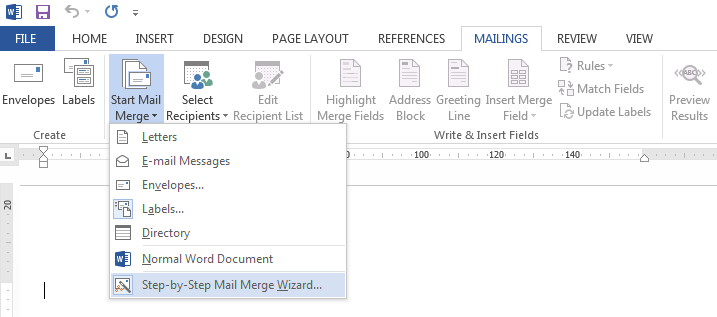
Open Word and create a blank document. Click on the “Mailings” tab at the top of the page, then click on “Start Mail Merge”, and select “Step By Step Mail Merge Wizard”. This adds a Mail Merge pane to the right hand side of your screen, which will guide you through the SIX steps involved in completing a mail merge. Simply follow the instructions at the top of the pane before clicking on the “Next” link at the bottom of the pane to move on to the next step.
STEP ONE: Select document type.
Easy peasy! Select “Labels” and then click “Next: Starting document”.
STEP TWO: Select starting document.
Use a compatible built-in label template if one is available in your version of Word.
Leave the top option as “Change document layout” and click on “Label options”. Make sure that you have the correct Label Vendor selected (e.g. A4/A5) and then click OK. This will bring up the template that you will use to design your labels.
If you cannot see the outline of the template, you have Table Gridlines turned off; click on the Table Tools “Layout” tab at the top of the page, and click “View Gridlines”.
If you do NOT have a compatible template code then you will either need to use the “New Label” button in the “Label Options” box to enter the measurements of your label sheets to create your own template OR you will need to use the “Start from existing document” option in the Mail Merge pane. Click “Open” to find and select your saved template file. Then click “Next: Select Recipients” in the Mail Merge pane.
STEP THREE: Select Recipients
Leave the top option as “Use existing list” and click on “Browse” to find and select your database. If your database is made up of multiple sets of data – for example, if you have an Excel spreadsheet with multiple sheets – you may be presented with a “Select Table” box; simply select the sheet that contains the information that you want to print and select OK.
If you need to make adjustments to your list, you can use the “Mail Merge Recipients” box to sort, filter, remove, or validate addresses in your list. Once you are happy with your list, or if you don’t need to make any amends, click on the OK button.

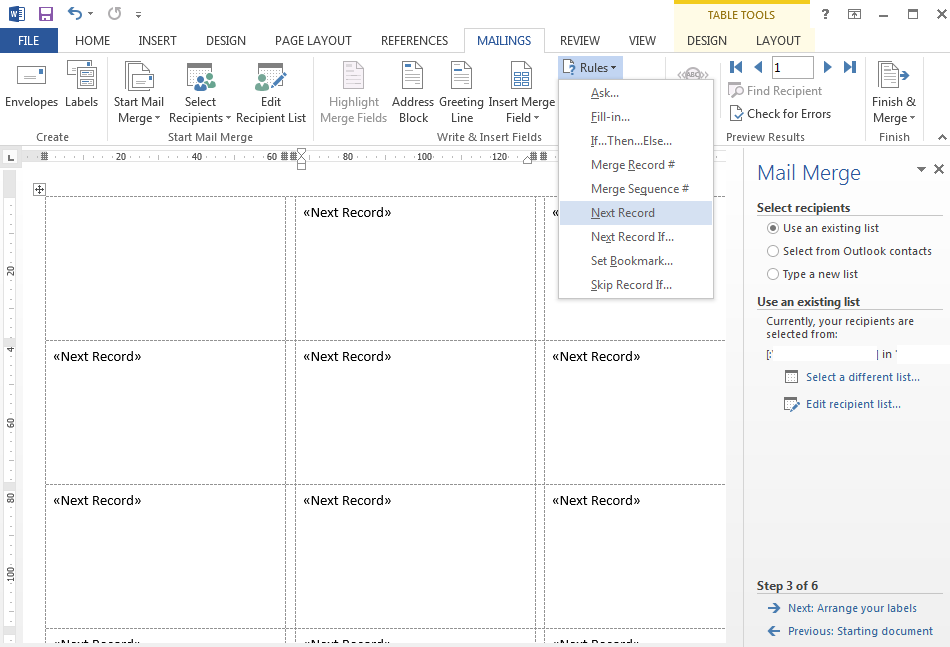
You should now see a Next Record rule in each of your labels APART from the top left label. If you aren’t using a built-in template (or a template you set up using the “New Label” button in “Label Options”) your template will be blank. You need to manually add the Next Record rule to your labels by left clicking once inside one of your labels (NOT the top left one), clicking on “Rules” in the Mailings tab, and selecting the Next Record option from the list. You don’t have to repeat this for each label; you can simply copy the first Next Record and paste it into the rest of the labels (NOT the top left one).
Then click on “Next: Arrange Your Labels” in the Mail Merge pane.
STEP FOUR: Arrange your labels
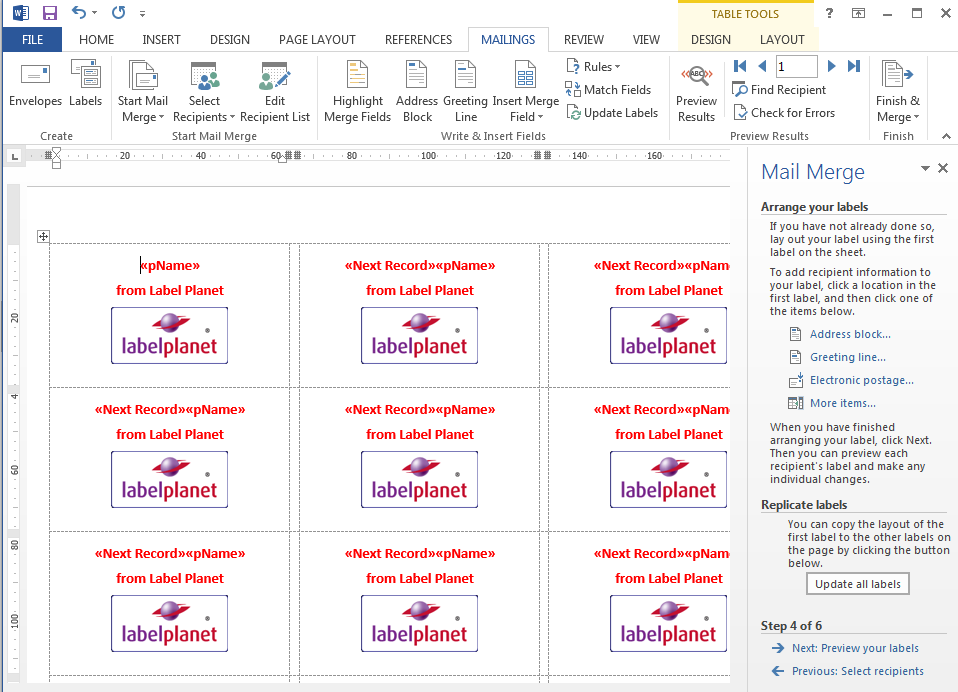
This is the part where you design your labels! You CAN just add your information as a block of text OR you can put in some extra design features, such as a company logo or a friendly picture to personalise your labels.
The easiest way to add information from your database is to use the built in options in the Mail Merge pane (Address block or Greeting line), but you can also use the “More items…” option in the Mail Merge pane or the “Insert Merge Field” option in the Mailings tab to add a placeholder for any bit of information from your database anywhere within your label design. A placeholder takes the form of «Information Name» where “Information Name” is the column header from your database; once you complete your merge, each placeholder will be replaced with the relevant piece of information from your database.
You must make sure that the Next Record rule always comes BEFORE the first bit of information that is pulled from your database in each label.
Mail merge is really designed to create a set of labels that share the same basic design but are each printed with information from a different record in your database (e.g. address labels with the same design but a different address on each label); to design your labels, set up your design in the top left label and then use “Update all labels” in the Mail Merge pane to instantly add your design to the rest of your labels. Alternatively, if you prefer, you can ignore the “Update all labels” option and add different designs to your labels manually.
If you are not using a built-in template or a template you have set up using the “New Label” button in “Label Options”, the “Update all labels” option is NOT available and you will need to set up each label individually – although you can still add your design to the top left label and then use copy and paste to transfer it into the other labels.
If you are using the Address block or Greeting line options, you may need to use the “Match Fields” function to tell Word which column in your database correlates to each element of the built in option. For example, if your spreadsheet doesn’t use the exact same column headings as the different elements in Word’s built in Address block, you can use the “Match Fields” function to tell Word that you want it to use the information from your column “Customer Surname” to fill in the “Last Name” element in the Address block (and so on). This also means you can use the Address block function even if you aren’t creating address labels. Use the “Preview” box to check through a few records to make sure you’re happy with how the information will be displayed.

When you are happy with your design, click on “Next: Preview Your Labels” in the Mail Merge pane.
STEP FIVE: Preview your labels
This step shows you what your labels look like once the placeholders have been replaced with the information from your database. We recommend using the “Preview another label” or “Find a recipient” options to check through a few different records to make sure that your design and layout works for each one. For example, you have may have one or two entries that are much longer than others, which could throw out the positioning of your design (perhaps even pushing some of your design off the edges of your label). If you need to, use the “Previous: Arrange your labels” option at the bottom of the Mail Merge pane to go back and correct any problems that you’ve found.
STEP SIX: Complete the merge
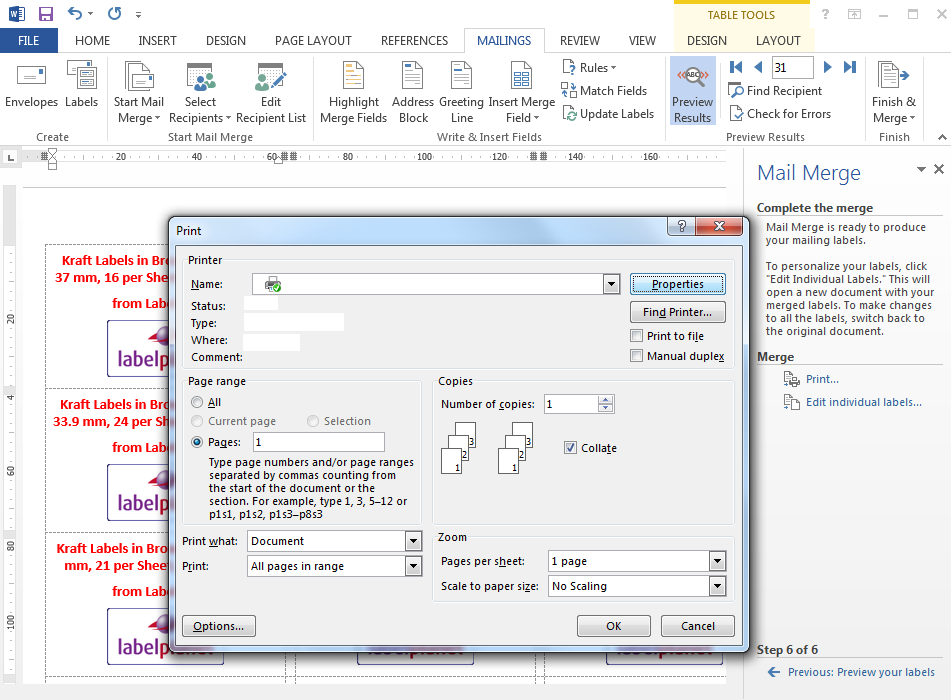
At this stage you can save your mail merged template, print your completed labels, or make some final amends/add personalised finishing touches using the “Edit individual labels” option. When you come to print your labels, we STRONGLY recommend that you do a test print FIRST either by selecting the “From…To” option and selecting the first few records from your database to print ONE page of labels or by setting the Page range option in the “Print” box to “Pages: 1” (see below). You should also click on the “Properties” button to check that all of your printer settings are correct; for example, make sure that the page size is set to A4, select a specific “Labels” or “Heavy Paper” setting, make sure that no scaling options (e.g. Fit To Page) are selected, and that no options such as Ignore Printer Settings or Use Driver Settings are selected.

Test print the first page of your mail merged template onto blank paper so that you can confirm that the alignment of your template is correct (and amend it if it isn’t) BEFORE you print your labels. For example, if your labels are all printing too high, you can go back and increase the top page margin to move all of your designs into the correct position.
The “Edit individual labels” option creates a new document which contains enough pages to display each of your merged labels (where the original mail merge document shows only one page with the first few entries from your database added).
USING A SAVED MAIL MERGED TEMPLATE
When you save a mail merged template, it remains linked to your list of addresses so keep both files safe and sound. If you lose, move, or rename your list of addresses, you can relink your template by clicking on the Mailings tab and selecting "Select Recipients". When you update your list of addresses, your changes will be used the next time you open your mail merged template. If you need to print from a saved mail merged template, remember to click on Mailings and select "Finish & Merge" to view all of the available print options. If you click on File > Print, you will only be able to print the one page of addresses that appears on your screen.
We hope this guide has helped to demystify the process of completing a mail merge a little, so you can get busy creating your own seasonal labels this Christmas. If you have any queries or encounter a particular problem that isn’t explained by this guide, please take a look through our Printing Advice pages or get in touch with our Customer Service Team and we’ll do our best to help!
 Label Planet